Microsoft word is a computer software application and it is part of Microsoft Office.
That we use to write Cv’s, Resumes, Cover Letters writing Books and composing in English and in other languages like Urdu and Hindi and etc.
You can type here in any language like English Urdu and Etc. There are many fonts you can use for English. Click here to download 500 Urdu fonts for MS Office.
Click here to learn all Winword shortcuts
After learning WinWord you will be able to work as a freelancer and you can work Fiverr.
Post writer: Rana Mehtab Alam
What is the first screen of Microsoft Word?
First, you need to type your text/data in Microsoft Word’s text editor window.
Second, you need to select the data to perform the different formats.
Now select the data and apply formats over it.
Click here for a complete list of Shortcuts using Microsoft Word.
How to make a selection in Microsoft Word WinWord?
Keyboard Selection
Hold Down the Shift key and then press the following keys to make the selection.
- Arrow Keys (to select text with shift and arrow keys)
- Shift +
- (←) Select from the cursor’s position to the left side depending on your selection requirement.
- (→) Right side selection.
- (↑) Upside selection.
- (↓) Downside selection)
- Home (Selection from the cursor to start of the current line)
- End (To select from cursor’s position to the end of the current line)
- Page Up (Select from the cursor to the up of of the Page)
- Page Down (To select from the cursor to the down of the page)
- Shift +
How to select the whole document at a time?
From the Home Tab under the Editing Section click on the Select All or you can use Ctrl + A.
How to Select Using Mouse in Microsoft Word?
- Hold down the left mouse button and drag the mouse to make a selection.
- Double click to select the current word.
- Triple-click to select the current paragraph
- Place the mouse pointer at the very beginning of the line and get an arrow shape, then just click to select the current line.
How to make a selection using both mouse and keyboard?
- Multiple selections using Mouse and Keyboard
- Make 1st selection
- Hold down Ctrl Key
- While holding down the Ctrl key, make other selections.
- Selection in Range with the help of keyboard and mouse
- Click on 1st point
- Hold down the Shift key …..
- Now click on the 2nd point to make the selection in range.
- Column Selection
- 1st press and hold the Alt key then make the column selection with the mouse.
What is the Home-Tab and all its features and functions in Microsoft Word
Home Tab
Under the Home Tab, you can see different sections like
- Clipboard
- Font
- Paragraph
- Styles
- Editing.
What is Clipboard?
A temporary area where a computer stores data that you transfer through copy and cut commands, that you can paste anywhere you need.
It is the 1st section under the Home Tab.

What is the function of Paste in a computer?
To copy from clipboard to cursor’s position.
- Ctrl + V
- Shift + Insert
- Mouse Right-Click then left-click on Paste.
- Click on

What is the purpose of the Cut command on the computer?
To erase the selected data from the current location and move it to the clipboard that you can paste anywhere you need.
- Ctrl + X
- Shift + Delete
- Mouse Right-Click then left-click on Cut.
- Click on

How to get a Copy on the computer?
To copy selected data to the clipboard.
Ctrl + C
Ctrl + Insert
Mouse Right-Click then left-click on Copy.
Click on ![]()
Format Painter
Using this feature you can apply the format of the selected to another text.
- Select
- Ctrl + Shift + C
- Click on

- then click on the text you want to apply format.
Font Section
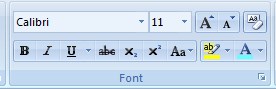
In the Home Tab, you can also see the Font Section as shown in the image below.
To change the font for your text 1st select it.
- Ctrl + Shift + F then press the up and down arrow keys and press enter to select the font
- Click on the Font window
Font size: To change the font size.
Ctrl + Shift + P (Then type the size under 1 ~ 1638)
Increase Font Size
![]() (Grow Font)
(Grow Font)
Ctrl + Shift + >
Ctrl + ]
Decrease Font size
![]() (Shrink Font)
(Shrink Font)
Ctrl + Shift + <
Ctrl + <
Ctrl + [
Note: Click on this icon ![]() to select a size from 8 to 72, but you can type the font size from 1 to 1638 in the size window.
to select a size from 8 to 72, but you can type the font size from 1 to 1638 in the size window.
Clear formatting: To clear all formats over the text and convert it to the default settings.
- Select the text
- Click on
 (Clear Formatting)
 - Ctrl + Space
Bold Text
Ctrl +B on and off
![]() Normal Text
Normal Text
![]() Bold Text
Bold Text
Italic Text
Ctrl + I on and off
![]() Normal Text
Normal Text
![]() Italic Text
Italic Text
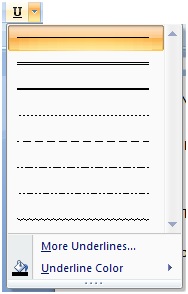
Underline Text
Ctrl + U
Underline on and off
![]() Normal Text
Normal Text
![]() Underline Text
Underline Text
You can also select underline styles.
![]() Strikethrough: To add a line at the center of the text.
Strikethrough: To add a line at the center of the text.
Ctrl + D then Alt + K single strike and alt + L for a ![]() .
.
![]() Subscript H2O (Ctrl + =)
Subscript H2O (Ctrl + =)
![]() Superscript (2)3 =8 (Ctrl + Shift =)
Superscript (2)3 =8 (Ctrl + Shift =)
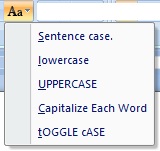
![]() Change Case, [Shift + F3] We can use this function to change the case of the text. Like lower case to UPPER CASE and others that you can choose from the change case options as shown in the image below.
Change Case, [Shift + F3] We can use this function to change the case of the text. Like lower case to UPPER CASE and others that you can choose from the change case options as shown in the image below.
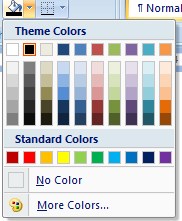
How to use Text Highlight Color?
By clicking on the Text Highlight Color icon ![]() you can get different colour options as shown in the image below.
you can get different colour options as shown in the image below.
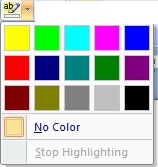
Text without using Text Highlight Color
![]()
How to change font colour in Microsoft Word?
Click on the Font Color icon ![]()
Text without colour.
1st select the text then click on ![]() your selected text will be coloured in Red.
your selected text will be coloured in Red.
If you want to change the colour then click on the down arrowhead and get the colour options as shown in the image below.
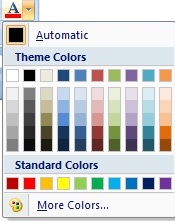
This line is in red colour.
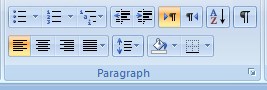
Paragraph Section
Under the Home Tab, you can also see the Paragraph section as shown in the image below.
How to add bullets and numbering?
By clicking on bullets ![]() and numbering
and numbering ![]() icons you can add bullets and numbers to the start of selected text.
icons you can add bullets and numbers to the start of selected text.
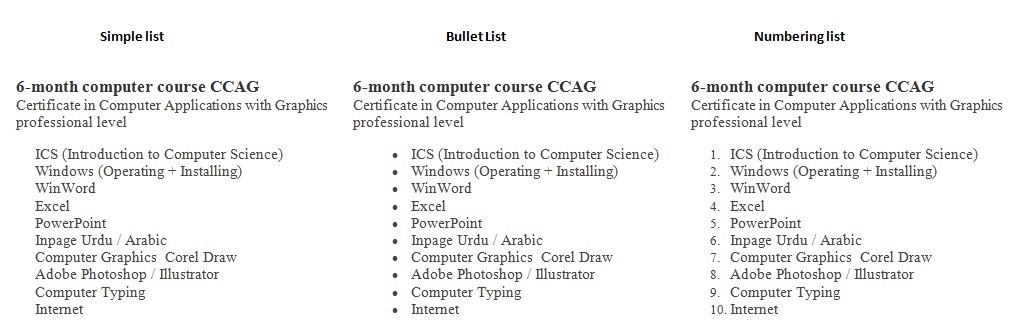
How to use Multilevel List in WinWord?
We use multilevel lit to describe the headings and subheadings in a list.
For example
I am offering CCA, CCAG and CIT computer Courses, so my main courses are CCA, CCAG and CIT While I can also describe sub courses in detail using the multilevel list.
We can use a shortcut method for multilevel lists.
Type 1. Press the Tab key type CCA then press Enter key
- CCS
Now I want to add courses details under CCS like ICS, Windows, WinWord and so on and under the Windows, I want to add (Operating and Installing).
You can use Tab and Shift-Tab for making a Multilevel list.
Example of multilevel list
- CCA
- ICS (Introduction to Computer Science)
- Windows
- (Operating + Installing)
- WinWord
- Excel
- PowerPoint
- Inpage
- (Urdu + Arabic)
- Typing
- CCAG
- (from (a) to (g) as above)
- Corel Draw
- Logo designing
- Pena flex design
- Adobe Photoshop
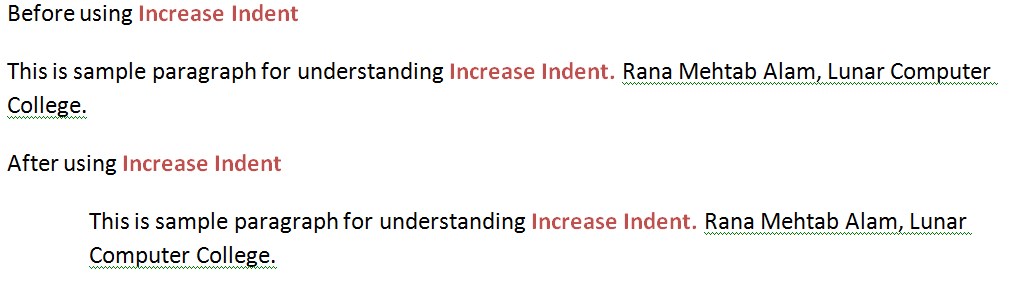
How to use Increase and Decrease Indent in Microsoft Word?
You can set the paragraph indenting using increasing decreasing indenting. Under the Home Tab under the Paragraph section, you can find Decrease Indent ![]() and Increase Indent
and Increase Indent ![]() .
.
Example of Indenting.
How to use the sort function in Microsoft Word?
If you want to sort the textual data in ascending and descending order then you can use this function, which you can get from Home Tab under the Paragraph section click on ![]() .
.
Firstly, select the text then click on the ![]() icon to sort it in ascending or descending order.
icon to sort it in ascending or descending order.
What are the uses of Paragraph Marks?
If paragraph marks are on then you can see the Tabs, Enter and the Spaces which have typed in your documents in symbols.
The icon of the paragraph mark ![]() which you can see in the Home Tab under the paragraph section.
which you can see in the Home Tab under the paragraph section.
How to align a paragraph?
There are four main ways to align the paragraph. which you can find in the Home Tab under the paragraph section.
 Left alignment (Ctrl + L)
  Right alignment (Ctrl + R)
  Center alignment (Ctrl + E)
  Justify paragraph (Ctrl + J)
How to set line spacing?
To set the line spacing for a paragraph or selected text you can use which you can find in the Home Tab under the Paragraph section.
You can also use these shortcuts for line spacing.
- Use Ctrl + 2 for (Double line spacing)
- Pres Ctrl + 5 (One and half line spacing)
- Ctrl + 1 (Normal line space)
How to add shading to the text?
In the Home Tab under the Paragraph section, you can find the shading icon, ![]() which you can use to set shade for the selected text as shown in the image below.
which you can use to set shade for the selected text as shown in the image below.
You can use options in the shading.

How to insert border to text or page in Microsoft Word?
To insert the border use border ![]() from Home Tab under the Paragraph Section.
from Home Tab under the Paragraph Section.
There are different border options that you can select for your page or selected text.
How to find the text?
Under the Home Tab in the Editing Section click on ![]() or press Ctrl + F
or press Ctrl + F
computer will display the find windows as shown in the image below.
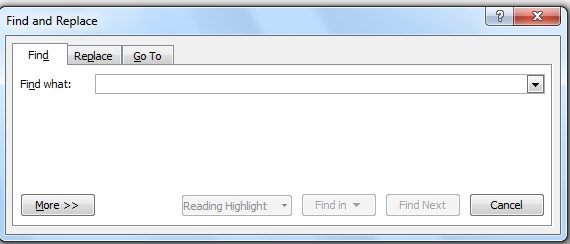
Type the text in front of Find what and press Enter to find it in the entire document.
How to replace the text with another text?
Under the Home Tab in the Editing Section click on ![]() or press Ctrl + H
or press Ctrl + H
the computer will display the “Find and replace” windows as shown in the image below.
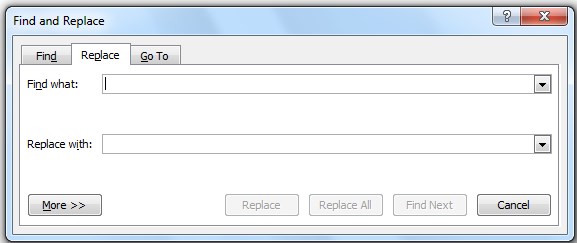
There are two text windows in the Find and Replace window
- Find what
- Replace with
type your text which you want to replace in the Find what text box and type the text which you want to replace with that text in the Replace with the text box.
How to use the Goto command in WinWord?
With the find and replace you can also see another option Goto there which you can use to go to a specific area of document selecting in the goto options.
Ctrl + G or F5 for goto
How to select the object with the text in WinWord?
If the object is not selectable then you can use this option to select the object.
That you can find under the Home Tab in the Edit section.
Video Lecture Home Tab in Urdu Hindi
What is the Insert – Tab and all its features and functions in Microsoft Word?
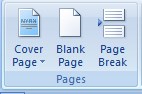
The 2nd Tab in WinWord is Insert Tab. In the Insert tab, you can see the Pages options.
There are three options in the Pages
- Cover Page
- Blank Page
- Page Break
Cover Page
(Insert a fully – formatted cover page)
You can insert the cover page from the cover page list as shown in the following image.
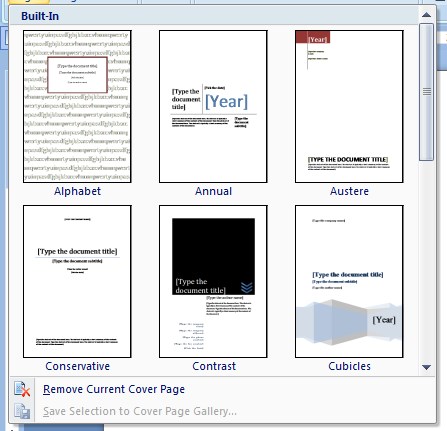
just click on the cover page sample to apply that sample to the page.
How to Remove Current Cover Page?
If you want to remove the current cover page then just click on ![]() to remove the current page cover from the current page.
to remove the current page cover from the current page.
Blank Page
(Insert a new blank page at the cursor position)
As you will click on ![]() then the computer will move the cursor to the next blank page while it will move the text from the 3rd page.
then the computer will move the cursor to the next blank page while it will move the text from the 3rd page.
Page Break
(Start the next page at the current position)
By using this ![]() option you can move your text to the next page from the current cursor’s poison. You can also use Ctrl + Enter for Page Break.
option you can move your text to the next page from the current cursor’s poison. You can also use Ctrl + Enter for Page Break.
How to Insert Table inWinWord?
You can insert the table in Winword by clicking on  .
.
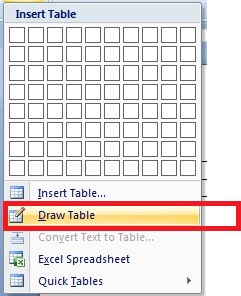
As you will click on the Table from the Insert tab you can see the following options as shown in the image below.
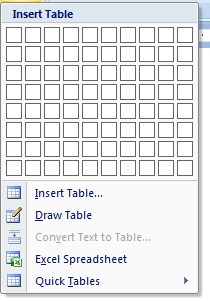
You can insert the table using the upper Insert Table options.
I recommended using Insert Table, but you can use any option as per your requirement and need.
Insert Table.
The computer will ask the number of columns and rows to insert the table as shown in the image below as you will click on Insert Table from the Table option of Insert Tab.
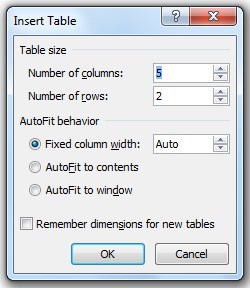
If you want to insert the table of 4 rows 4 columns, then type 4 in the Number of columns and 4 in the Number of rows and pres the Enter as shown in the image below.
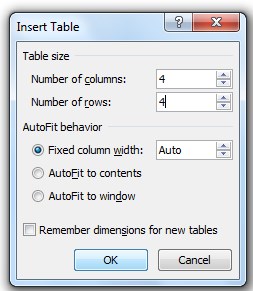
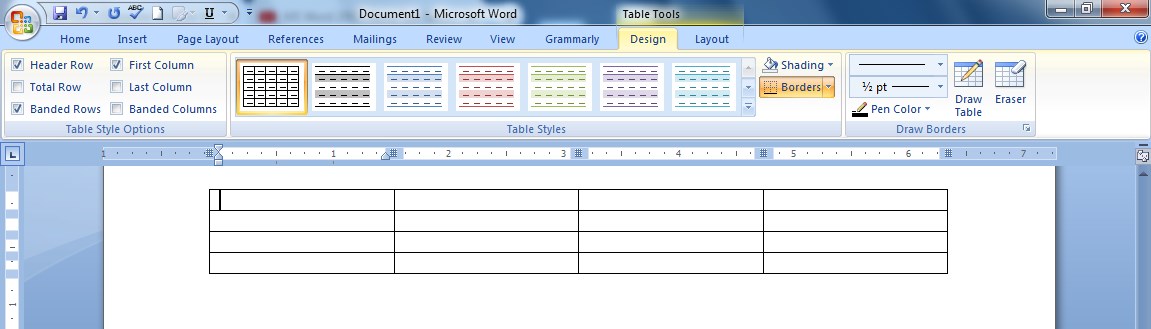
As you will press the Enter key computer will create a table with 4 columns and 4 rows as shown in the image below.
How to Draw Table in WinWord?
To draw a table click on Draw Table from Insert Tab in the Table. Then use the mouse to draw the table as shown in the image below.
How to convert text to the table?
To convert the text into the table first select the text then click on Convert Text to Table from the Insert Tab in the Table as shown in the image below.
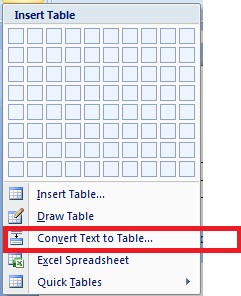
Your selected text will convert into the table.
How to Insert Excel Spreadsheet in the WinWord Document?
To Insert the Excel spreadsheet in the WinWord Document, click on Excel Spreadsheet from the Insert Tab in the Table as shown in the image below.
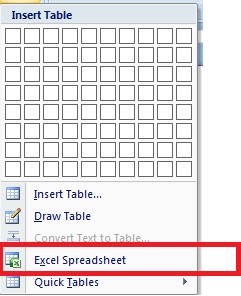
As you will click on Excel Spreadsheet computer will insert an Excel Spreadsheet as shown in the image below.
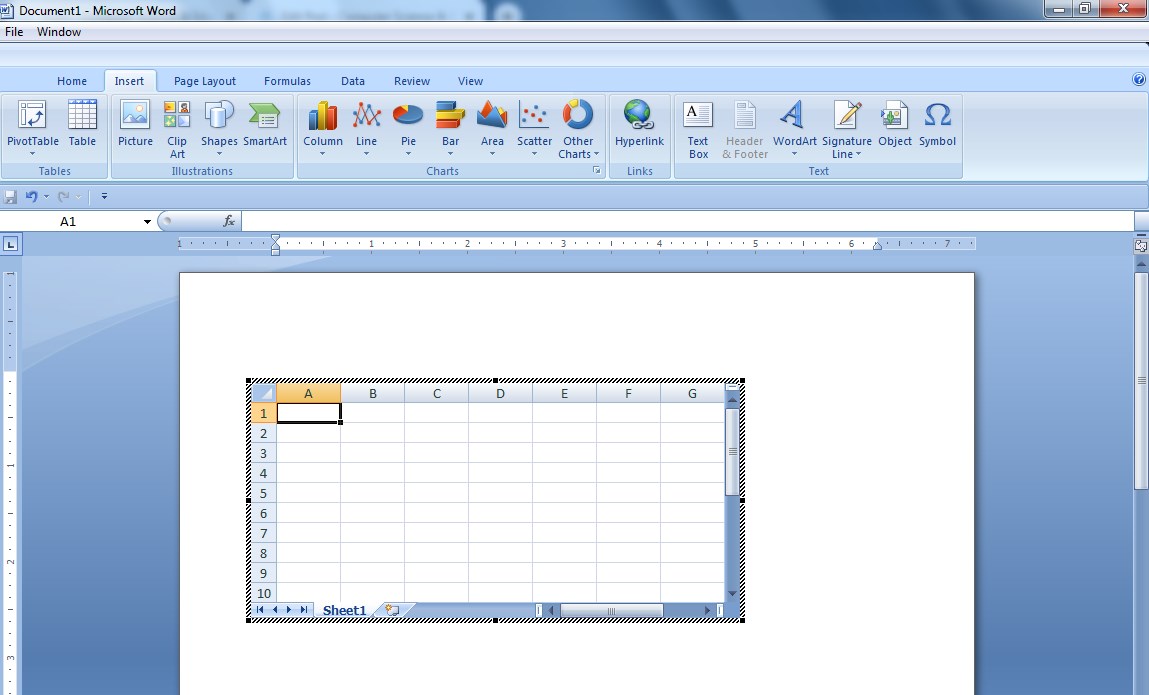
Double click on the Excel Spreadsheet to edit it and to add data to it.
How to Insert Quick Tables in Winword Document?
To Insert the Quick Tables in the WinWord Document, click on Quick Tables from the Insert Tab in the Table as shown in the image below.
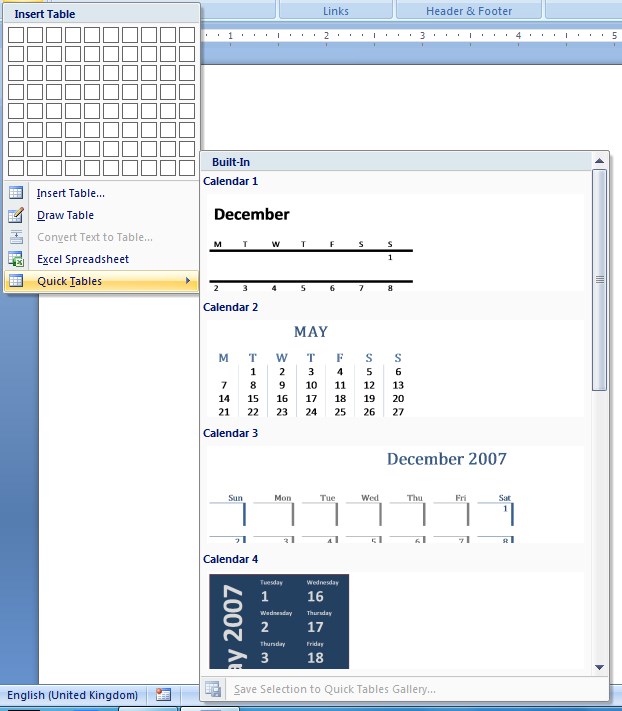
Now select any quick table to use in the word document.
What are the Illustrations in WinWord?
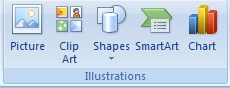
In the Insert Tab, you can see the Illustrations Section and there are different options that you can use.
- Picture
- Clip Art
- Shapes
- Smart Art
- Chart
Picture:- By clicking this option you can insert the picture into the document from your computer’s diskettes drives.
Clip Art:- You can insert the images from the MSOffice library, if your internet connection will be on then you can get more images online.
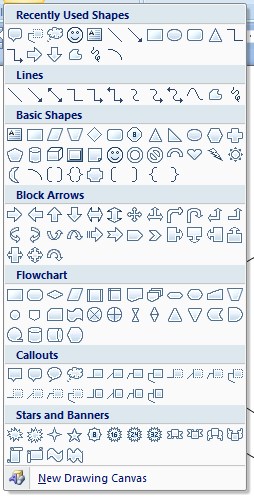
Shapes:- To draw any shape in WinWord you can use these shapes options.
What is the use of green, blue and yellow dots in the shapes?
When you draw an image from the shape tool. Then you can see different dots on the shape after selecting it as shown in the image below.
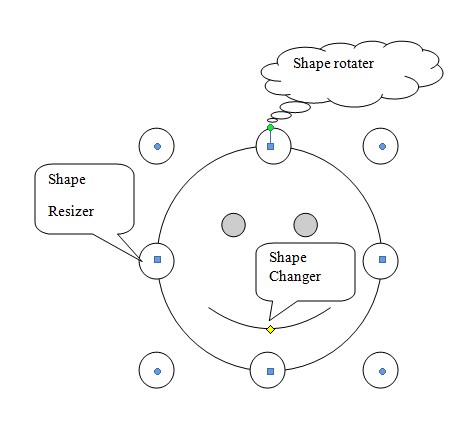
If you draw a smiling face from the shapes then you will click on the ![]() to draw it using a mouse.
to draw it using a mouse.
Now as you will draw the smiling face it will be as shown in the image below

But if you want to change its mood from happy to angry then click on the shape. You will get a yellow dot on the shape mouth line that you can use to change its shape as shown in the image below

Now you have changed the shape’s mood from happy to angry as shown in the image below.

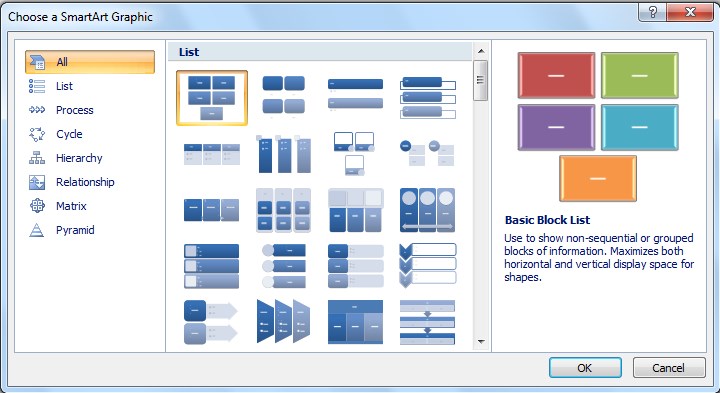
SmartArt: You can use this option to draw smart art in your document as shown in the image below.
Chat: In WinWord you can use this chat option to import chat from an excel sheet.
What are the Links in WinWord?
In the Insert Tab, you can see the Links section.
There are three options in the Links Section
- Hyperlink
- Bookmark
- Cross-Reference
Hyperlink: To create a link just select text or object, then click on Hyperlink to use hyperlink shortcut (Ctrl + K) and type target address or bookmark.
Bookmark: To give the name of text location that you can access with hyperlink or Goto command.
Cross-Reference: It is the combination of bookmark and hyperlink.
you can create a table of content using this option and go to the specific topic.
1st type table of content in the page first, then make pages according to your indexing content.
make the first line as headings of all pages except the content page.
Open the Cross-Reference and select heading and link with the headings
watch the following video to understand the Cross-Reference