
Corel Draw 2020 Full Course, in this course you will learn CorelDraw 2020 completely. Do not need to worry, if you are using any other version of Corel Draw.
Keep reading this post and learn the Coreldraw and do the practice on to your Corel version.
In this post, you will learn to complete CorelDRAW 2020 step by step.
Click here If you want to learn CorelDraw 9 Complete and you can also learn Corel Draw shortcuts.
How to Install and Use CorelDRAW 2020
Click on the ad New CorelDRAW Suite 2020 if it is displaying on this website.
Or you can get this software from its official website.
I recommend using the registered copy of Corel 2020 for getting the benefits of all the features.
After Installing and registering open the Corel Draw
Click here if you want to read about what are the uses of CorelDraw?
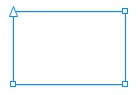
Corel Draw 2020 First Welcome Screen
When you will open the CorelDraw 2020 the following window opens.
There are different options that you can use
1).  You can use this option to get a new blank document. or Ctrl + N.
2). ![]() Click on this button or press Ctrl + O to open the saved file in Corel Draw.
Click on this button or press Ctrl + O to open the saved file in Corel Draw.
3). ![]() In CorelDraw 2020 you can find this New from Template button at the welcome screen.
In CorelDraw 2020 you can find this New from Template button at the welcome screen.
This is a very useful option where you can get ready-made templates and create new ones too.
You can use these templates in future anytime you need them.
How to use Toolbox CorelDraw 2020?
Pick Tool
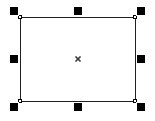
Pick tool is a very important tool. You can select, move and transform the objects.
To select the object just click on it. Or if you want to select in range then hold the left mouse button and drag to select in range.
For multi-selection hold the Ctrl key from the keyboard and click the objects to make selections.
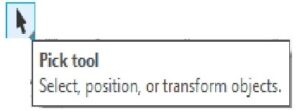
How to move the object with the Pick tool in Corel Draw 20202?
Firstly, click on the object with the Pick tool that you want to move. secondly, hold the object from any position by holding down the left mouse but and drag the mouse to move the object.
When you will move the mouse on the object which is already selected then the mouse pointer will change its pointer shape into this shape ![]() .
.
Now hold the left mouse button and drag it to move the object.
There are two ways to move the object
- Move the object freely
- Move the object straight.
Move the object freely
To move the object freely just use the pick tool and select it then hold the object by holding down the left mouse button and drag the mouse to move the object.
You can move the object freely by using this method anywhere you want.
Move the object straight.
To move the object straight vertically or horizontally do the same as you do to move the object just hold the Ctrl key to move it straight.
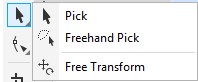
There are more tools in the pick tool
Pick tool, freehand pick tool and free transform tool a shown in the image below.
How to use the freehand pick tool in Corel Draw 2020?
In Corel Draw 2020, you can also use the freehand pick tool ( ![]() ) to select the specific objects among other objects.
) to select the specific objects among other objects.
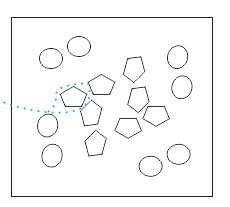
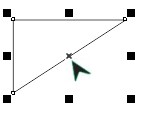
Select the object by selecting it using the freehand pick tool in Corel Draw 2020
Sometimes it is very difficult to select an object among the objects but now it is quite easy because of the freehand pick tool.
Just select that object with the freehand pick tool.
Make sure to start your selection outside the main object as you can see in the image below where the main object is a rectangle where I am selecting a polygon with the help of a freehand pick tool.
Select the object by clicking on it using the freehand pick tool in Corel Draw 2020
you can also select the specific object with the freehand pick tool just click on its boundary line as shown in the image below.

How to use the free transform tool in Corel Draw 2020
Free transform tool ( ![]() ) that you can get from the pick tool.
) that you can get from the pick tool.
And this free transform tool has four (4) options that you can use for different purposes.
- Free rotation tool (
 ).
). - Free angle reflection tool ( ).
- Free scale tool ( ).
- Free skew tool ( ).
Free rotation tool ( ![]() ).
).
In the free transform tool, we can use the free rotation tool to freely rotate the object by the positioning of the free rotation tool then rotate it as shown in the image below.

Free angle reflection tool ( ![]() ).
).
Another option that we can see in the free transform tool is the free-angle reflection tool.
This option is used to mirror the object by positioning the reflection angle tool and then move it in a circle by the mouse holding the left button.

Free scale tool ( ![]() ).
).
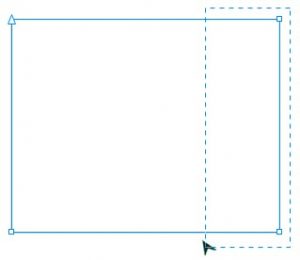
you can object dimension size by using this free scale tool from the free transform tool.
just put the mouse on the object hold the left mouse button and drag it to rescale while selecting the free scale tool.

Free skew tool ( ![]() ).
).
We use this free skew tool to slant the object by positioning the skew tool and using the mouse while holding down the left mouse button to skew the object.

How to use the shape tool in Corel Draw 2020 and all its options?
As we can guess from its name (shape tool ![]() ) it can set any shape according to your need.
) it can set any shape according to your need.
Shape tool we can get from the toolbox by clicking on its icon (![]() ) or by pressing the F10 key from the keyboard.
) or by pressing the F10 key from the keyboard.
firstly draw any object like rectangle, circle and polygon etc then use the shape tool to change its shape.
For example, I’m using a rectangle to explain the use of the shape tool.
Shape 1 |
Keep a selection on the rectangle and press F10 for the shape tool. | 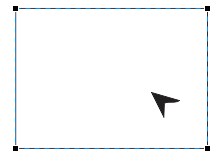
Shape 2 |
After pressing F10 you will notice that shape 1 will change into shape 2 and the mouse cursor will also change as you can see on the above table.
now the rectangle has 4 nodes as shown in the image below.
Secondly, you can use the shape tool mouse pointer (![]() ) on these nodes to change the shape.
) on these nodes to change the shape.
Put the mouse pointer onto the object and hold the left mouse button drag to change the shape.
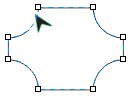
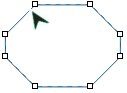
Normally, you can use the following three options with the shape tool.
- Round Corner ( ).
- Scalloped Corner ( ).
- Chamfered Corner ( ).
Select the object with the Pick tool then use the Shape tool and select its option according to your need.
And then change the shape as you can see in the image below.
| Object | Shape Tool | Result |
|
Round Corner |
 |
|
Scalloped Corner |
 |
|
Chamfered Corner |
 |
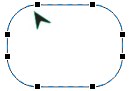
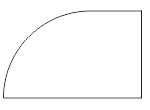
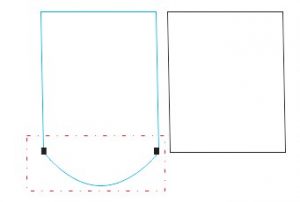
How to change anyone side or more of a shape with the shape tool
Suppose we want to change the one corner of a rectangle into a round, scalloped or chamfered corner as shown in the bellow.
Draw a rectangle
Select the round corner option and type the radius in the text box of which corner you want to round.
Make sure the lock is unlocked otherwise all corners will round.
![]()
Result after applying the command
What is the convert to curves in Corel Draw 2020?
When using the shape tool to change the shape and if we want to add more node then we use the convert to curves option by press Ctrl + Q.
We can also open convert to curves action for the shape tool from the Object menu or by clicking on this icon ( ![]() ) from the property bar of the shape tool.
) from the property bar of the shape tool.
After converting the curves now you can add more nodes by double-clicking on the object line and then you can use that node to change the shape
| Before convert to curves | After convert to curves |
|
 |
Now you can use the shape tool to change the object shape from the node. See the image below.
| Before | After |
|
 |
How to use all options of the shape tool in Corel Draw 2020?
After using the Ctrl + Q with the Shape Tool (convert to curves) then the property bar of the Shape Tool will change and you can see the following tools on it.
Shape Tool options after pressing Ctrl + Q in Corel Draw 2020
- Rectangular
- Freehand
- Add nodes
- Delete nodes
- Join two nodes
- Break curve
- Convert to line
- Convert to curve
- Cusp node
- Smooth node
- Symmetrical node
- Reverse direction
- Extract subpath
- Extended curve to close
- close curve
- Stretch or scale nodes
- Rotate or skew nodes
- Align nodes
- Reflect nodes horizontally
- Reflect nodes vertically
- Elastic mode
- Select All nodes
Rectangular
use to select the nodes in rectangular. Hold the left mouse button and drag to select the nodes.
Freehand
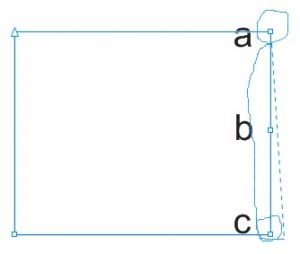
This option you can use to make a freehand selection of the nodes. let’s suppose you have three nodes in a, b and c in a line while you want to select node a and c.
Add nodes (![]() )
)
You can use this option to add nodes. Click on the line of the object to get the node position and then click on (![]() ) to convert that position into the node.
) to convert that position into the node.
Double click to add the node.
Delete nodes (![]() )
)
Select the node that you want to delete then click on ( ![]() ) or double click on the node to delete it.
) or double click on the node to delete it.
Join two nodes (![]() )
)
To join the two broken nodes. First, select the broken nodes then click on (![]() ) to join them together.
) to join them together.

Break curve ( ![]() )
)
To break the object from the node. First, select the node then click on ( ![]() ) to break the object from the node. Use the mouse to make them separate.
) to break the object from the node. Use the mouse to make them separate.
Convert to a line ( ![]() )
)
To convert the curve into the line. First, select curved nodes then click on ( ![]() ) to convert them into a straight line.
) to convert them into a straight line.
Convert to the curve (![]() )
)
You can use this option to convert the line into the curve with the help of handles

Continue to learning Corel Draw 2020 Full Course …….